

About

Hello, my name is Anthony Sena-Chavez, and I am currently a junior attending Colorado State University. I am majoring in Apparel Design and Merchandising with a concentration in Product Development. It is because of how clothing and fashion can impact a community and help one find a community that I believe apparel is essential to today's society. Because of this, I hope to be able to contribute and further the sustainable efforts in the fashion industry.
Displayed is my favorite Mural by Patrick Kane McGregor located in Denver!
Wild West Wear Spring Summer 2022 Collection
Wild West Wear is a brand idea and concept that originally started off as a brand idea for a class. However, ever since then I have been running with it and have been taking the steps necessary to make this class idea become a reality. The first step in doing so was to create a collection and products for my brand. Notably, this is the first collection and step in establishing my brand and vision. The first collection displayed will include four leather products intended for Spring/Summer 2022.

Inspiration
My inspiration for this collection undeniably stems from streetwear and pop culture today. In todays world, musicians and music artist are gigantic trendsetters who are apart of this pop culture, who have the power to impact what millions wear. It is because of this that a lot of my inspiration comes from rappers today. Intervened with this is also new style punk.
Product One: Leather WWW Wallet
Technical Flats
To the right are the technical flats for this wallet. This wallet is essentially comprised of nine pockets. One being the money pouch, three other stacked pockets acting as a card holders on each half of the wallet, and two side pockets one on each side of the wallet.

Colorways

1
Production Process


The first step in this process involved creating the technical flats utilizing Adobe Illustrator.
2
After, the technical flats were created in Illustrator they then were printed out and cut by hand to see if the stitching holes lined up.
3
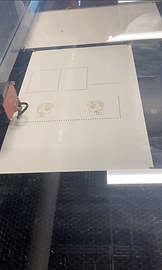
Then, a laser cutter was utilized to give 100% confirmation that when applied to leather, the same result would occur.

4

After two paper tests it was then time to utilize the laser cutter on real leather to test etching and to understand and have a solid idea of the settings needed to be implemented into setting up the laser cutter for the final product
5
It is also important to note that within this process etching was tested more than once in order to test various looks and effects.
Once the leather was finally laser cut and etched, hand sewing took place. It is important to note that within this production process that the first prototype provided many learning experiences, and helped in realizing unseen problems and faults. Such as the original desired fabric being too thick, as well as very difficult to hand sewn, resulting in a change in fabric for the final.


Final WWW Wallet


Product Two : Sailboat Pouch
Technical Flats
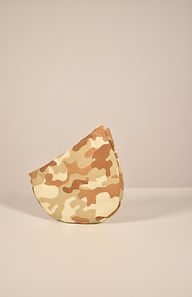
To the right are the the technical flats for the Sailboat Pouch. The structure and shape of the pouch is intended to look like that of a sailboat, hence the name. This pouch features a exterior half pocket with my UV Printed logo topstitched on top. The pouch also consists of a flap that utilizes a magnetic snap to act as a closure, for the main compartment.

Colorways
Production Process
1
2
After the technical flats were created and my vision for my pouch was finalized, I began pattern blocking
The first step in this process involved creating the technical flats utilizing Adobe Illustrator.
3
Once I believed I was completely finalized with my pattern blocking I printed it out and constructed it with paper to ensure that my vision and the construction of my pouch would be functional when it came to construction with fabric
4
After the paper prototype was deemed successful, I then moved on to utilizing practice fabric in order to visualize and understand the construction of my pouch
5
Notably for the prototype pouch, I utilzied the laser cutter in order to cut my fabric percisely. It is important to note that for my practice fabric and final fabric that a practice run was done in order to find the most optimal settings
6
6
After my pattern block was laser cut for my prototype it was then time to assemble my pouch. I utilized a Juki DDL-8700 in order to sew the pouch together.
Once the prototype was constructed and neccessary changes were made to the patternblocking I then began to utilze the UV printer.
Product Two : Sailboat Pouch
Technical Flats
To the right are the the technical flats for the Sailboat Pouch. The structure and shape of the pouch is intended to look like that of a sailboat, hence the name. This pouch features a exterior half pocket with my UV Printed logo topstitched on top. The pouch also consists of a flap that utilizes a magnetic snap to act as a closure, for the main compartment.
Colorways
Production Process
1
2
After the technical flats were created and my vision for my pouch was finalized, I began pattern blocking
The first step in this process involved creating the technical flats utilizing Adobe Illustrator.
3
4
After the paper prototype was deemed successful, I then moved on to utilizing practice fabric in order to visualize and understand the construction of my pouch
5
Notably for the prototype pouch, I utilzied the laser cutter in order to cut my fabric percisely. It is important to note that for my practice fabric and final fabric that a practice run was done in order to find the most optimal settings
6
It is important to note that this process did take many trials and errors.
6
6
Finally, I then laser cut my final fabric with the updated patternblocking
Product Two : Sailboat Pouch
Technical Flats
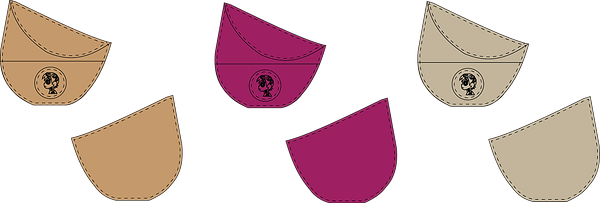
To the right are the technical flats for the Sailboat Pouch. The structure and shape of the pouch is intended to look like that of a sailboat, hence the name. This pouch features an exterior half pocket with my UV Printed logo topstitched on top. The pouch also consists of a flap that utilizes a magnetic snap to act as a closure, for the main compartment. The Sailboat Pouch's main fabric is 100% cotton
Colorways
Production Process
1
2
After the technical flats were created and my vision for my pouch was finalized, I began pattern blocking
The first step in this process involved creating the technical flats utilizing Adobe Illustrator.
3
Once I believed I was completely finalized with my pattern blocking I printed it out and constructed it with paper to ensure that my vision and the construction of my pouch would be functional when it came to construction with fabric
4
After the paper prototype was deemed successful, I then moved on to utilizing practice fabric in order to visualize and understand the construction of my pouch

6

After my pattern block was laser cut for my prototype it was then time to assemble my pouch. I utilized a Juki DDL-8700 in order to sew the pouch together.
5
Notably, for the prototype pouch, I utilized the laser cutter in order to cut my fabric precisely. It is important to note that for my practice fabric and final fabric that a practice run was done in order to find the most optimal settings
7
It is important to note that this process did take many trials and errors.


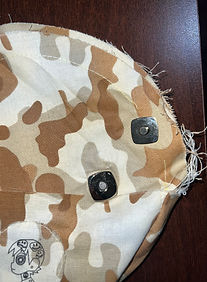
Once the prototype was constructed and necessary changes were made to the pattern blocking I then began to utilize the UV printer. The biggest change that is worth mentioning before taking a deeper dive into the UV logo and key fob is the closure. Originally a zipper was intended but after the prototype, I found that an addition of a snap and a flap would be more functional and appealing which could be seen in the final pouch.
8
In order to UV print my logo After I had my UV printed logo where I wanted it, I began to use the UV printer in order to Uv print my logo on a piece of leather to act as a key fob


9
Finally, I then laser cut my final fabric with the updated pattern blocking
10
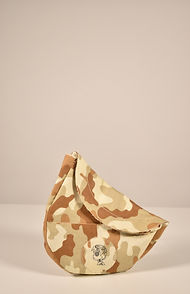
Finally, I then sewed my final sailboat pouch with my final fabric and attached my UV printed logo and my 3D silhouette.


Final Sailboat Pouch


Product Three: Wild West Tote Bag
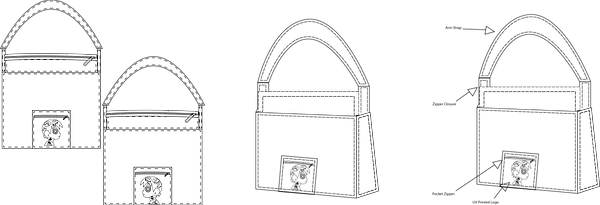
Technical Flats
To the right are the technical flats for the Wild West Tote Bag. The Wild West Tote Bag consists of a huge compartment, providing lots of room and space for one's belongings, with a zipper closure. The Wild West Tote Bag also includes two zipper pockets on the exterior each featuring a UV printed logo. Along with this a 3D silhouette of my logo was created and utilized to act as a zipper pull. This tote bag's main fabrics include 100% duck cloth canvas for the exterior, 100% polyester for the interior, and 100% cotton for the pocket

Colorways
Production Process
1
The first step in this process involved creating the technical flats utilizing Adobe Illustrator.

2
After the technical flats were created and my vision for my tote bag was finalized, I began pattern blocking
4
After the paper prototype was deemed successful, I then moved on to utilizing practice fabric in order to visualize and understand the construction of my totebag
3
Once I believed I was completely finalized with my pattern blocking I printed it out and constructed it with paper to ensure that my vision and the construction of my tote bag would be functional when it came to construction with fabric
5
Notably for the prototype tote, I utilized the laser cutter in order to cut my fabric precisely. It is important to note that for my practice fabric and final fabric that a practice run was done in order to find the most optimal settings

6
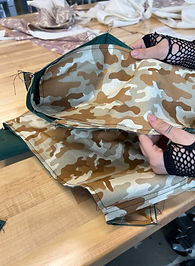
After my pattern block was laser cut for my prototype it was then time to assemble my pouch. I utilized a Juki DDL-8700 in order to sew the tote bag together.
8
7

Once the prototype was constructed and necessary changes were made to the pattern blocking I then began to utilize the UV printer, in order to UV print my logo onto my fabric before attaching and sewing it to my final tote
After I had my UV printed logo where I wanted it, I began to use a 3D printer in order to 3D print my logo's silhouette to act as a zipper pull
9
Finally, I then laser cut my final fabric with the updated pattern blocking, it is important however to note that when laser cutting I utilized a new fabric that I haven't used before, and because of this I had to trial and error with the laser cutting settings.
The interior fabric's design pattern used was notably created by me within illustrator, in which I utilized a dye-sublimation printer to transfer my print onto fabric. More details on the pattern and fabric could be seen in my CAD tab
It is important to note that this time around I was able to UV print my logo on the first try because the fabric utilized for my pockets was the same fabric used for my tote
10
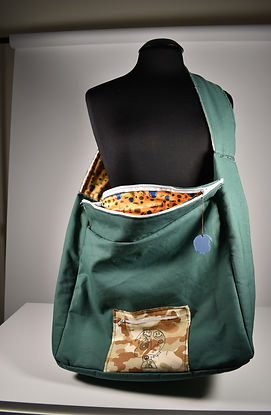
Finally, I sewed my final wild west tote bag with my final fabric and attached my UV printed logo and my 3D logo silhouette zipper pull

Final Wild West Tote Bag


Wild West Wear Spring Summer 2022 collection Final Product Display


